
Getting started
with Clevera
What Clevera does anyway
Clevera is an AI how-to video creator that takes a normal screen recording and turns it into a polished, narrated tutorial or product demo, automatically. You don’t need to speak while recording (it’s optional), and you don’t need to be a video editor or a voice actor. Clevera analyzes what happened on screen, writes a voiceover script, picks a synthetic voice, times everything, and gives you an editor to make quick tweaks.
What you’ll need
A Mac or Windows machine
A Clevera account (log in at app.clevera.ai)
If you talk while recording, Clevera does not use your real voice in the final video. Your speech is only used as context to write a better script. The final narration is generated using a synthetic voice.
Install & set up (first time only)
Download & Install the Clevera recorder app.
Grant Permissions when Clevera app prompts you:
Accessibility permission
Input Monitoring permission
Screen Recording permission
Microphone permission
Clevera only listens while you’re actively recording. Input Monitoring just captures key logs during a recording session, and it ceases when you stop.
Tip: If macOS doesn’t show Clevera under Screen Recording permissions, open System Settings → Privacy & Security → Screen Recording and enable Clevera, then restart the app.
Start your first video (two easy ways)
Method 1: from the web app
Go to app.clevera.ai and click New Video.
Go to "My Videos" page and click on the "New Video" button on the top right corner
Method 2: From the Mac menu bar or Windows system tray.
Click the Clevera icon in your Mac menu bar or Windows system tray.
Choose New Recording to start a session.
Choose what to record
In the Clevera recorder app, pick your capture target:
Entire Screen
Records everything on your display. Best for multi-window workflows or when switching apps.Single Application
Captures only one app/window. For example, if you're recording a something on your browser, you can capture only the browser window.
Optional settings:
Microphone On/Off
Turn it on if you want to speak while recording (for extra context). Turn it off if you don't want to provide extra context. Clevera can still write and narrate the whole thing.Countdown Timer:
Set how many seconds to wait before recording starts. From the macOS app, go to Settings -> Recording -> Countdown Timer.

Press Start Recording when you’re ready.
Tips for while you're recording
When you’re recording, keep these tips in mind for better results:
Move the mouse smoothly, avoid fast jumpy moves.
Pause briefly after each action (e.g. click a button). That micro-pause gives Clevera processing time and helps Clevera detect action boundaries.
If you talk while recording:
Stop moving the mouse while you’re speaking, then continue your actions.
Your speech is not used in the final video, it’s just context to enrich the script.
Synthetic narration will be generated later in your selected voice.
Don’t circle the mouse to highlight things. You can add highlights or zooms cleanly in the editor later.
Keep it short. Aim for ≤ 5 minutes per recording. For big topics, split them into smaller videos.
Minor mistake? Keep rolling. You can edit out some mistakes later in the editor.
Finish the recording
Click Complete Recording from the macOS or Windows app. You’ll land on a setup page where you can tell Clevera how to build your video.
Generation settings
Language: Choose the language for your voiceover. (You can translate later.)
Tone: Casual, inspirational, professional,... pick the vibe.
Voice: Select from available synthetic voices. We recommend using Google voices.
Additional Context: Explain what this video is about and add any extra context or general instruction for AI to follow.
Click Generate. This will take a few minutes. Longer recordings, can take up to 15 minutes. You can safely close this window and return to the app.
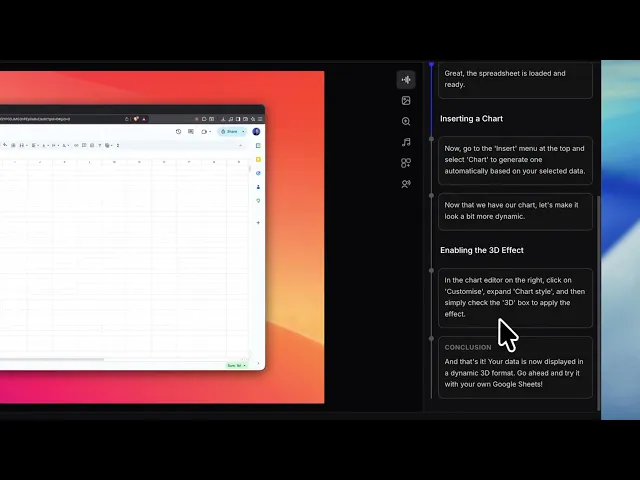
Editing your video (the fast fun part)
When your video is ready, open it in the editor. From the right sidebar find all the voiceovers by event.
You’ll see a list of events (each action on your screen) with a voiceover line.
Disable any line to show the action without narration (useful for very simple clicks).
Edit a line by clicking on the edit button below each voiceover.
Ask AI to rewrite a specific line (e.g., “shorter,” explain more,” “mention CSV import”) by clicking on the rewrite button below each voiceover.
Revise the entire script with global instructions (e.g., “Make tone more casual; add a 1-sentence intro for each section.”). To do this, click the Revise button in the top bar to open the Revise window.
Visual tools (precision without pain)
Smart Zoom: Focus on important regions when actions happen; zoom back out smoothly.
Highlight: Draw attention to buttons, fields, or menus.
Mask/Blur: Hide emails, customer data, or API keys.
Callouts/Text: Add short annotations or step numbers if needed.
Image: Add an image to the video. (e.g. logo, screenshot)
Multi-language in one click
Translate the video into any supported language. Clevera will:
Translate the script.
Re-generate the synthetic voiceover.
Keep timing aligned.
Sharing & exporting
Once you're happy with your video, you can share it with public. Clevera supports multiple methods to share your video.
Live links & embeds (recommended)
View-only link: Share a URL with customers or teammates.
Embed: Place the video on docs, help centers, your website, Notion, Jira or anywhere that supports HTML/iframe.
LiveSync magic: When you update your Clevera video, all links and embeds update instantly. No re-exports. No new links. No broken docs.
Export to MP4 (static)
Download a traditional video file if you must upload to platforms that require MP4. (e.g. YouTube, Vimeo, etc.)
Remember: exported MP4s are static, future edits will not auto-update.
You’re good to go! 👍 Now you’re all set to start making your own Clevera videos. Have fun creating!
Using ElevenLabs with Clevera
To use ElevenLabs as your voice engine, add your own API key in Clevera. ElevenLabs will bill you directly.
Requirements:
API key permissions
ElevenLabs > API key > Administration, enable Read for both User and Model.Enough credits
Keep your ElevenLabs balance topped up. If credits run out, voice generation will fail.
FAQ
Do I have to talk while recording?
No. It’s optional. If you do talk, your voice is not in the final video; it just helps the AI write.
How to reduce support tickets with video
Using Clevera, you can create a video tutorial that answers common questions and reduces support tickets.
Can I rewrite the voiceover?
Yes, per line or globally. You can also change tone and voice.
Can I blur sensitive info?
Yes, use Mask/Blur on any area.
How can I contact support?
If you have any other questions, please feel free to contact our support team.
What are product-led growth tutorials?
Product-led growth tutorials are a type of tutorial that is used to help users learn how to use a product. They are typically used to help users learn how to use a product in a way that is specific to the product.
How Clevera can help with customer education with AI
Clevera is an AI powered tool that can create how-to videos effortlessly. This enables teams to create many videos to cover every detail of product.
How much will it cost to create a video with Clevera?
Clevera charges credits to create videos. Check plans and pricing here.
Can I see some live examples of embedding videos?
Yes, you can see some live examples of embedding videos here.
How can I download Clevera recorder app?
You can download Clevera here.